PSR-2000/2100 973x377x161 mm

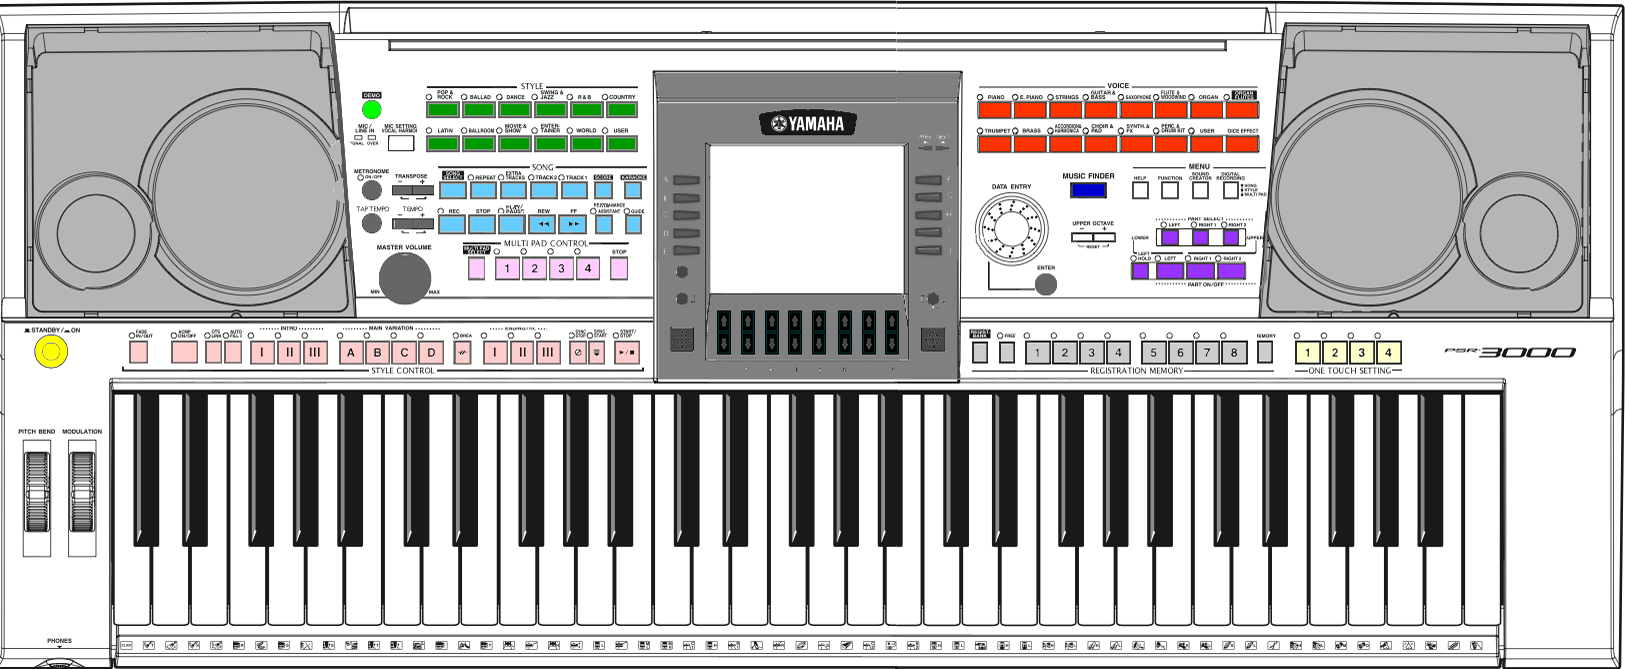
PSR-3000 937x399x167 mm
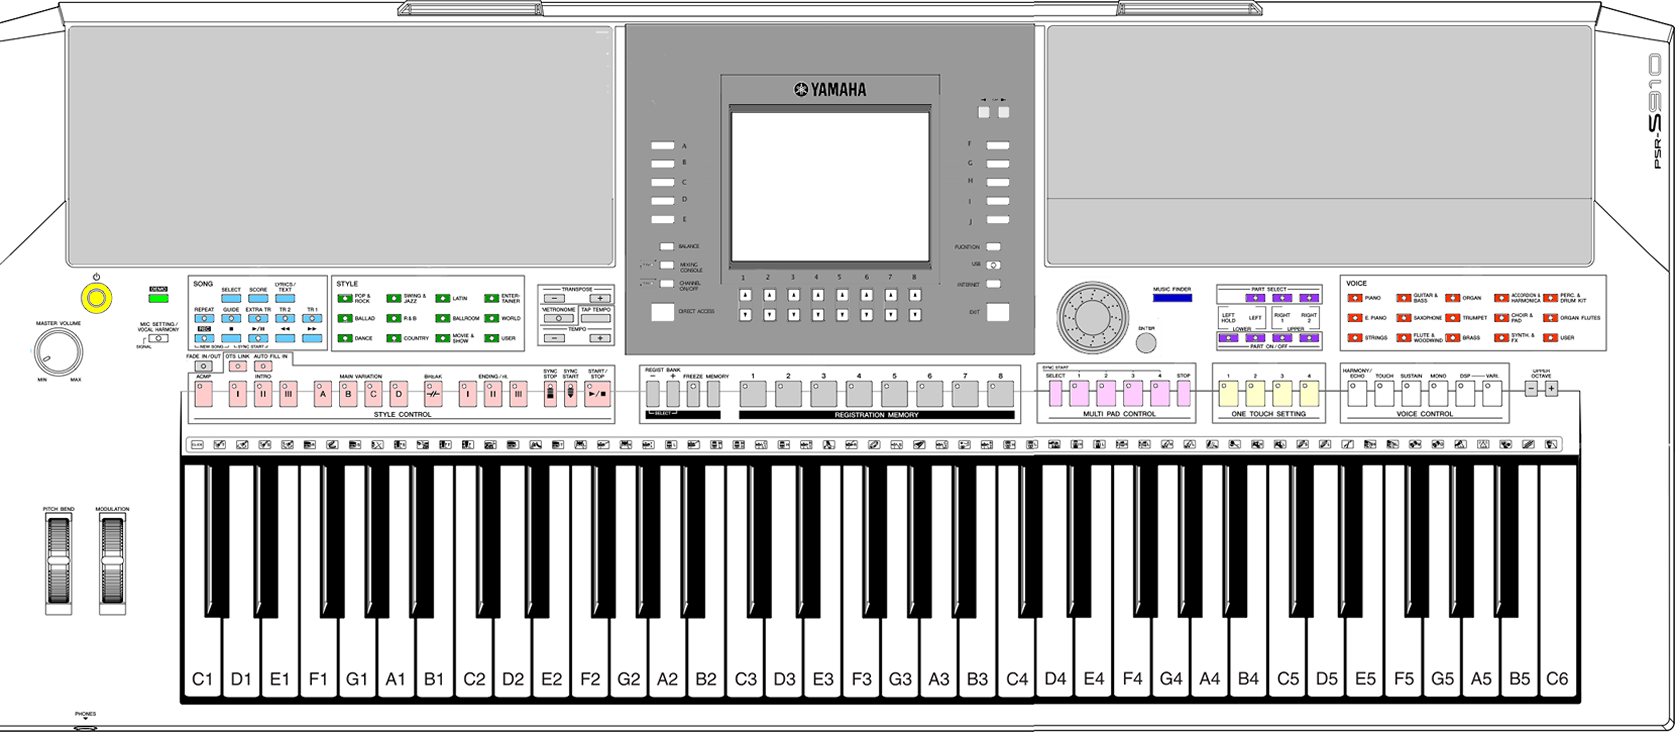
PSR-S900/psr-S910 1003x433x148 mm
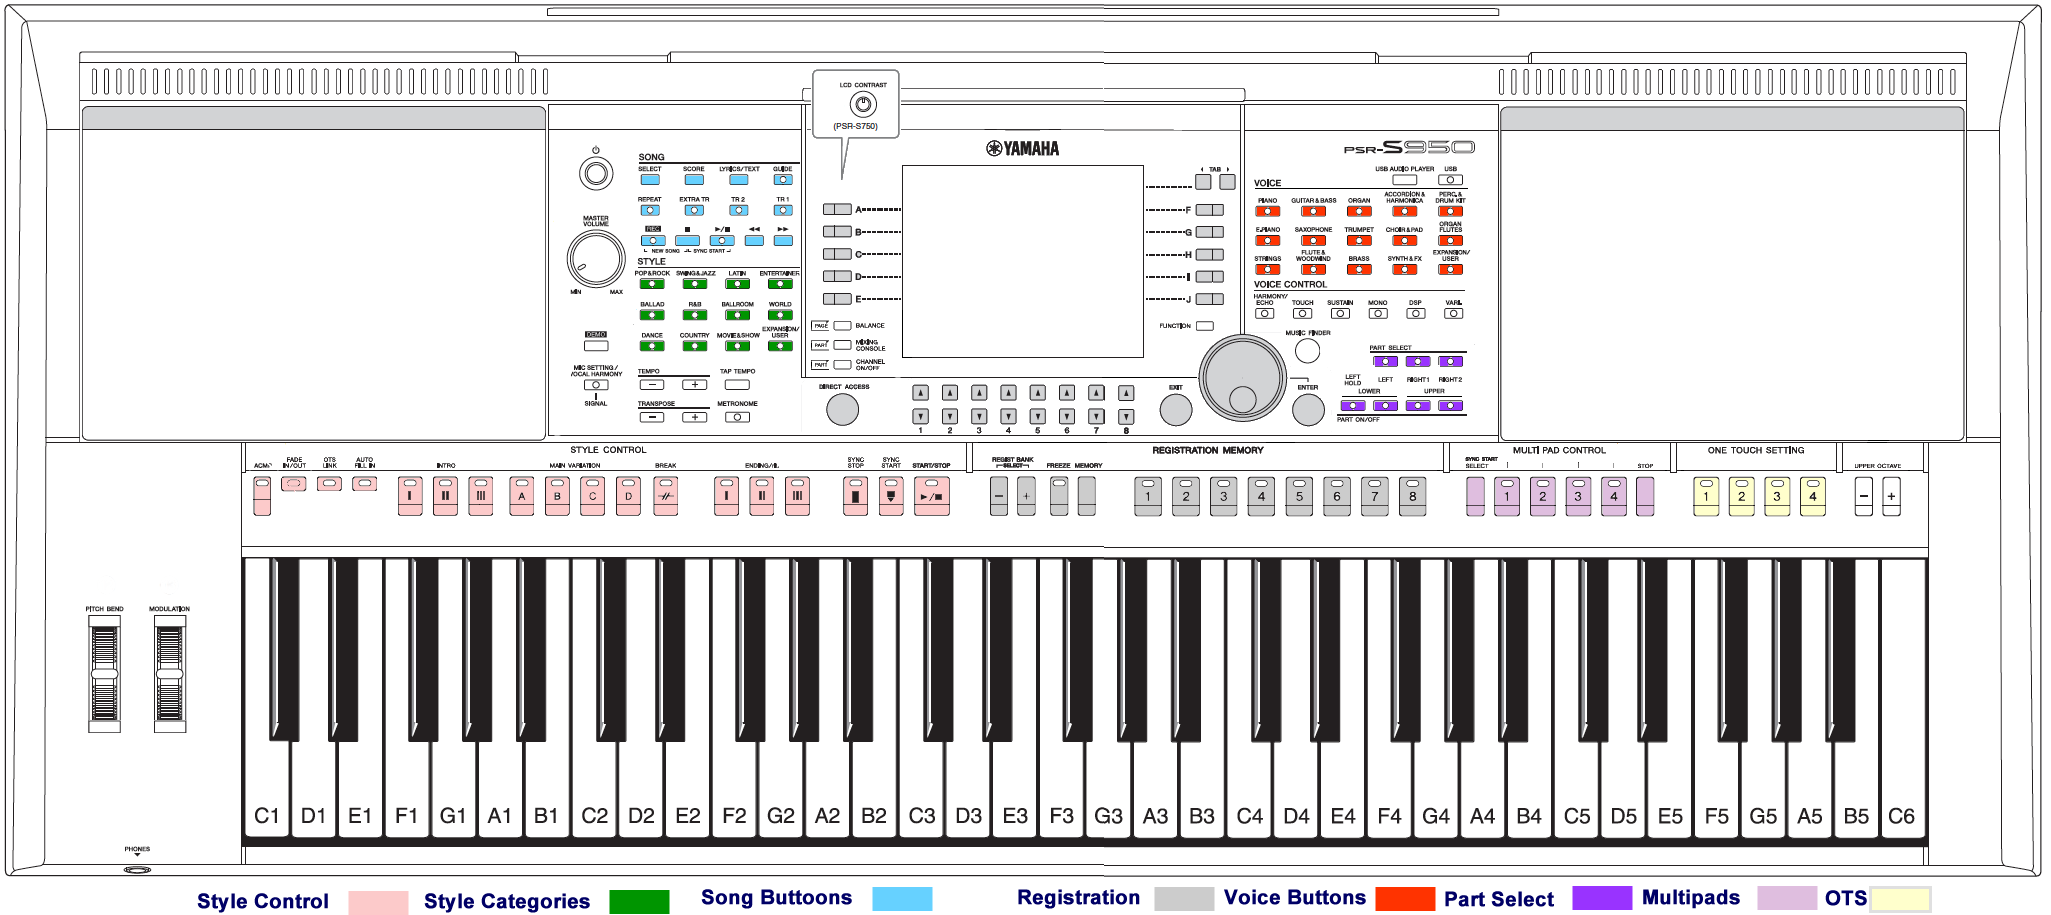
PSR-S950 100x437x148 mm
Click on any model for a larger view.
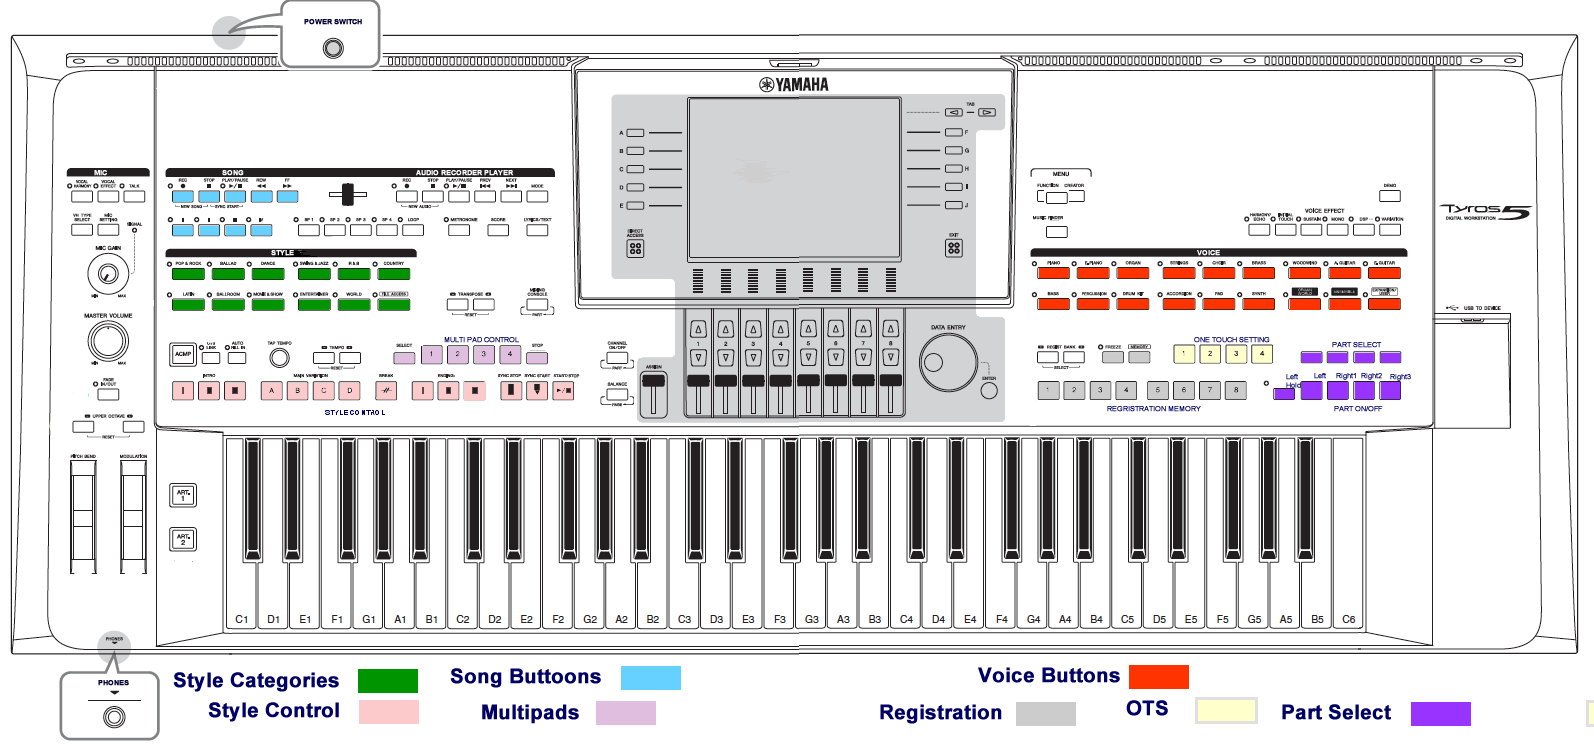
Yamaha Arranger Keyboards Top Panels
I originally wrote these lessons for the Yamaha PSR-2000. Fortunately, as Yamaha introduced new models almost each year, the basic operation of their arranger keyboards has remained the same. As a result, no matter which keyboard model you own, you can benefit from these lessons. Let's look briefly at the similarities and differences in these various models.
Similarities
The drawings shown here illustrate the similarity, and the differences, between the Yamaha mid-range arranger keyboard models. The layout of the PSR-2000 and PSR-2100 is identical as is the layout of the psr-S900 and psr-S910. The speaker grill takes up more space on the Yamaha PSR-S900 and PSR-S910 and the buttons, perhaps as a result, are much smaller. The speakers are again smaller on the PSR-S950 and the buttons moved up to the left and right side of the main screen. Note that the Multi Pads and OTS buttons are on the right side of the panel on the PSR S950. The layout of the PSR-S970, introduced in 2015, the PSR-S975, introduced in 2018, and the current PSR SX920 and PSR-SX900 are the same as that of the PSR-S950.
The Yamaha PSR-SX900 and the PSR-SX920, however, has a new touch-sensitive "Home" screen. All the previous models have a central "Main" screen accessed by buttons surrounding the screen.
All of these mid-range keyboards from the PSR-2000/1000 up to and through the PSR-S975/S775 include similar functions, and have similar buttons to operate these functions. I've color-coded some of the standard sections in the keyboard illustrations here to show you where similar button sections are located. The actual buttons on your keyboard are, of course, not color coded.
The MAIN display screen is 320x240 with 5 selection buttons on the left and 5 more on the right side of the screen with 8 pairs of selection buttons below the screen. The newest model, the PSR-SX900/SX700 and PSR-SX920/SX720 includes a MAIN display screen, but it has NO BUTTONS on the left, right, or bottom of the screen. MAIN screen selections are made by touching the screen rather than pressing a button. The next lesson discusses the keyboard display in some detail.
Each model has a set of style category buttons on the left side of the main display and a set of voice category buttons on the right side of the main display. On all the models, a set of style control buttons are located above the keys on the left side of the keyboard and buttons to select voices are found on the right side of the keyboard. All of the models except Genos, have 8 Registration buttons. These are located a bit right of the center screen on the PSR-S950/S970/S975 and PSR-SX900, under the center screen on the PSR S900 and PSR S910 and on the right side on the PSR-2000 and PSR-3000. You will find the volume control on the far left side of the keyboard and a data wheel just right of the screen.
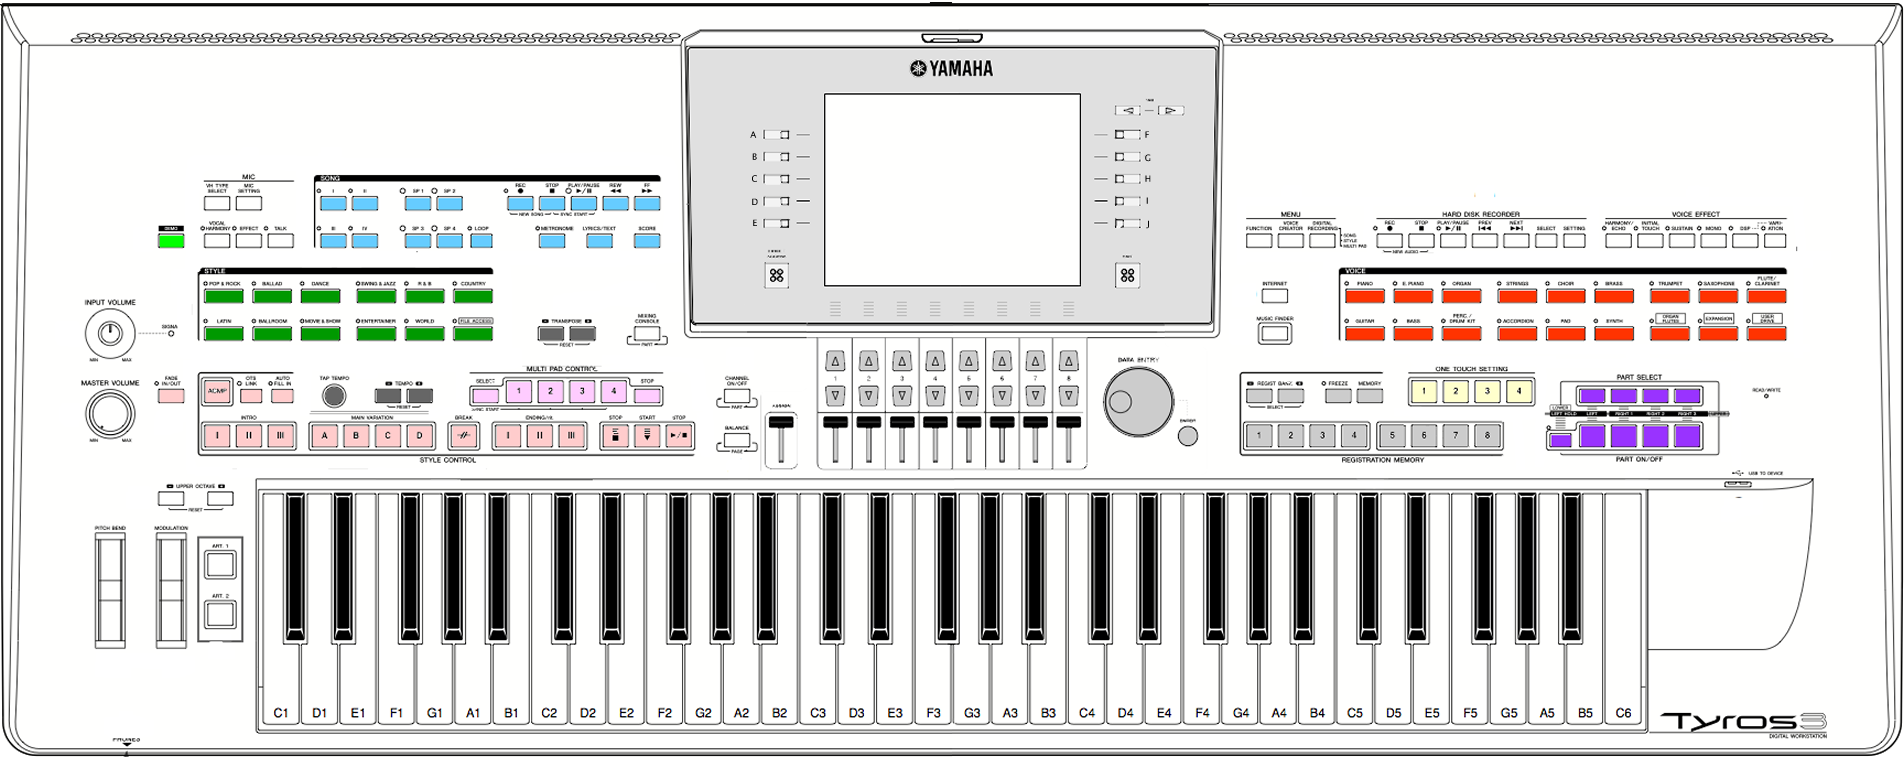
Tyros3 1140x450x143
Tyros5-61 1140x450x142 mm
If you happen to have a Yamaha Genos or one of the Tyros models, you are going to find the same basic layout. The figure here shows the Tyros3 and Tyros5. Like Tyros, the Yamaha Genos series do not have built-in speakers. The Genos models uses the touch-screen interface rather than buttons on the left, right, and botttom of the main screen to select screen options. The Genos series have 10 Registration buttons.
Yamaha Tyros models do not have built-in speakers and so there is more room for buttons on the keyboard panel. It is also a bit wider and deeper (and heavier) than the mid-range models. The main screen is larger and has a higher resolution (640x480). Style buttons and controls are found on the left side and the voice buttons and controls are found on the right side. The Tyros series have 8 slider controls under the main screen and so the registration buttons remain on the right side of the keyboard. The Tyros5-61 is the same size as the Tyros3 and Tyros4. However, the Tyros5-76 is bigger (1347x450x142 mm) and is heavier (16 kg vs 14 kg).
Differences Between Yamaha Arranger Keyboards
So what's the difference in Yamaha Arranger Keyboard models? While all the models have a set of buttons for various style categories, the actual number of preset styles, that is, styles included with the keyboard, has generally increased with each succeeding model. Similarly, the number and quality of preset voices included with the keyboards have also increased over the years. The flagman (higher-end) models have more styles and more voices than the mid-range models. The improved quality of the instrument voices is also quite dramatic.
How you store additional files has also evolved over time. The PSR 2000, PSR 2100 models and the Tyros 1 included a floppy disk drive for external files. The Yamaha PSR-3000 moved to a Smart Media Card rather than a floppy disk and also added a USB port. Recent models continue to rely on the USB port and some now have internet connections built in. The Tyros models allow for an internal hard drive (HDD). The Genos series does not include a hard drive. The Genos1 has approx. 58GB Internal Memory Storage and the Genos2 has approx. 15GB Internal Memory Storage. Additionally you can use large USB Flash Drive (for example 1TB) on the Genos keyboards
Operating the Yamaha Keyboard
While the sound quality of the music produced by these yamaha keyboards has improved over time, the basic operations have not changed. How you interact with files is identical on all these keyboards. They all have included preset styles. Each style has 4 main variations ([A],[B],[C],[D]) as well as three different introductions, 3 different endings and the Break and 4 Fill In. Each style includes four One Touch Settings (OTS) with various voices defined for each of the main style variations. Styles are controlled with chord fingering options that are the same on all yamaha arranger keyboards. They all have four multipad buttons, which can add variety to the style, and 8 registration buttons (Genos 1 and Genos 2 have 10 registration buttons) where you can save your keyboard settings. They all include the Music Finder feature (The Genos and PSR-SX Series has been replaced Music Finder feature to the Playlist system) and all the models allow you to modify preset styles and create your own variations. They all play MIDI Song files and they all allow you to record your own midi files. Of course, the more advanced models or the most recent keyboards will have unique features not available in earlier models. But the basic operation of these keyboards is similar no matter what model you have.
The two newest models, the Genos and the PSR-SX models include a touch-screen interface. This new interface means that how the various features are called up and accessed is very different from the method used in all the previous models. Insteady of pressing buttons on the keyboard, the user can use some buttons for some features, but many may only be available through options shown on the screen and are selected by touching the screen. The new interface will be discussed in each of the relevant sections as various features are covered. We're excited to announce that detailed, step-by-step video tutorials for your Yamaha keyboards are coming soon! Dive deeper into its features and functions with our easy-to-follow guides designed to help you master your yamaha keyboards with confidence.
What this means for you is that you can benefit from the free lessons provided here in the PSR Tutorial no matter what model you have. It also means that if you have an older model and are thinking of upgrading, the learning curve for the new models will be significantly reduced since most of the things you learned on your current model will continue to work on your new keyboard. Additionally, the PSR Tutorial Forum is your best friend if the lessons on this website do not cover your requirements. PSR Tutorial Forum – Where Global Yamaha keyboard players connect! Join the best community for support, tips, and inspiration for your Yamaha keyboard. Need fresh, custom styles for your Yamaha keyboard? Whether you're searching for unique styles or something that's just not available elsewhere, PsrStyles.com is your go-to source. PSR Styles team is always happy to help you create exactly what your music needs—with precision, creativity, and genuine support.
Turning the Yamaha Arranger Keyboard On
Are you ready to get started now? Well, you can just turn the keyboard on by pressing the "STANDBY/ON" switch, generally located on the left side above the "MASTER VOLUME" control knob. Everybody ready?
Whoops, what's that? Tyros3, Tyros4 and Tyros5 owners can't find the "ON" switch? Nope. No matter how hard you look, you won't find the "ON" switch. Why is that? Because someone at Yamaha had the bright idea of putting the POWER ON/OFF switch on the BACK panel of the Tyros3 (and Tyros4 and Tyros5). In the illustration below, the switch is on the right side of the back panel (left side of the keyboard if you are facing the front of the keyboard) right next to the AC Power Cord Socket. To turn the power on, you have to reach back and feel for the switch and depress it. This was NOT a good idea. Fortunately, the power switch was placed back on the top panel for the Yamaha Genos.
Back Panels of yamaha Keyboards

Since the back panel has entered the discussion, at least for Tyros3/4/5 owners, let's take a minute or two to examine what is back there.
- The power cord is plugged into the back of your keyboard.
- All of the keyboards support foot switches of foot controllers (Tyros and Genos models support three, the others two) and these are plugged into the back panel.
- All models have MIDI IN/OUT ports for connecting to external midi devices (Tyros and Genos models have two pair MIDI IN/OUT ports).
- All models have an OUTPUT (R L/L+R) 1/4 jack for connecting to a stereo system or external speakers.
- All models have a MIC/LINE switch for switching between mic or line input. Tyros2 and Tyros3 have two mic/line inputs. The Genos1 and Genos2 have a Combo Jack input with the Phantom Power (+48 V).
- Models after the PSR2100 include an AUX IN jack for connecting external audio devices like a CD player for output through the keyboard speakers.
- Video Output is supported on all models except the PSR-2000 and PSR-2100. The PSR-3000 features RCA video output. The PSR-S Series includes VGA video output. The PSR-SX Series and the first-generation Genos support USB video output. The Genos2 offers HDMI video output.
- A USB TO HOST port (for connecting the keyboard to a computer) is available on all models except the PSR-2000.
- A USB TO DEVICE port (for connecting a USB storage device) was introduced with the PSR3000 and is included with the PSR-S Series, PSR-SX Series, Tyros2/3/4/5 models and the Genos Series.
- Finally, the Tyros and Genos series also include jacks to connect external left and right speakers as well as a sub-woofer since these models do not have internal speakers.
While the panel control buttons let you make changes to the keyboard settings, you still need a method to see what options are currently set. The main display screen is your central control panel so the next lesson takes a look at the MAIN display screen and how you interact with it.
Related Articles
- MAIN Display Screen Of Yamaha Keyboards
- Download Yamaha Keyboard Service Manuals
- Handmade PSR Keyboard Stand
- Yamaha Keyboards General Questions - Forum Topics